Warrior Task - Range Cards
It’s basically a mini map
References: ATP 3-21.8 | FM 21-75 Appendix 1 | DA 5517 (Range Card)

What is all of this?
It might seem like gibberish but all of the info in the range card is quite helpful. Range cards are typically used by machine gunners or snipers to record critical info about the area they are observing. it contains quick reference to important targets and shows the distance and direction of said targets thus ensuring accurate target acquisition. Range cards are combined with sector sketches and used by leadership to ensure 360 security. If it seems too complicated, try to think of it like a mini map that shows important targets. For our purposes, the only time you fill out a range card is when you are the assigned 240 gunner. Range cards are constantly updated as the environment changes.

Range Card Components
Let’s split the range card into 5 components to make it easier to understand
Header Info
 This is the easiest part to fill out, Simply fill your assigned Squad, Platoon and Company
for the magnetic north use your compass and jot it down
This is the easiest part to fill out, Simply fill your assigned Squad, Platoon and Company
for the magnetic north use your compass and jot it down
Sketch area
 The mini map area. here you will draw any terrain features, targets, firing lines and any other important indicators. the Dot indicates your current location
Data Section - Base
 Here, you will fill out more admin data. Position Identification is usually “Primary”. The Date will be todays date in the following format: 18 AUG 2025, List the weapon you are using (240B) and the distance each circle will equal in meters. Doctrinally: If the distance to the terrain feature is less than 450 meters, then each circle represents 50 meters. If the distance is between 450 and 900 meters, then each circle represents 100 meters. If the distance to the terrain feature is greater than 900 meters, then each circle represents 200 meters. For the most part it will be 50m and you can change this as you see fit
Data Section - Targets
 This is the meat and potatoes of the range card. It contains info on the firing lines and selected targets. We will go more in depth in a bit.
Remarks
 Use this section to add any additional info, I usually use this to add a map legend so the user can understand what he’s looking at.
Terminology
Okay, now that we know the structure of a range card let’s take a look at the terminology before we start filling one out.
Sectors of fire
The area a gunner is responsible for, Basically where you will be shooting
Target Reference Point (TRP)
Reference points used as an aid for target acquisition.
Left and Right Limits
The limits are indicated by a solid arrow, You cannot fire beyond those limits
Maximum Engagement Line
Shows how far the weapon system can shoot, this depends on the type of weapon you are using for example the 240B with tripod has an effective point range of 800m, therefore you would mark accordingly
Final Protective Line (FPL)
The FPL will always be the No1 target in the data section. It is a predetermine line where a machine gun provides continuous fire to stop an enemy advance. Sort of used like a Last Resort when the enemy is about to overrun defensive positions. When employed correctly with interlocking sectors it provides a wall of fire so nothing can penetrate through it. The FPL is typically set to the most likely avenue of approach it is shown as a bold line in the range card and is pointed in the data section.
Principal Direction of Fire (PDF)
More flexible than a PDF, it covers a general area of fire and can shift within the sector if needed. For our purposes you typically focus on FPL’s
Direction, Deflection and Elevation
These important characteristics indicate where the target is approximate to your location. Suppose you are a 240 gunner. The 240 is typically seated in a tripod that looks like this

The tripod ensures stability and accuracy whenever the 240 is used. Now, let’s take a look at the gunner side
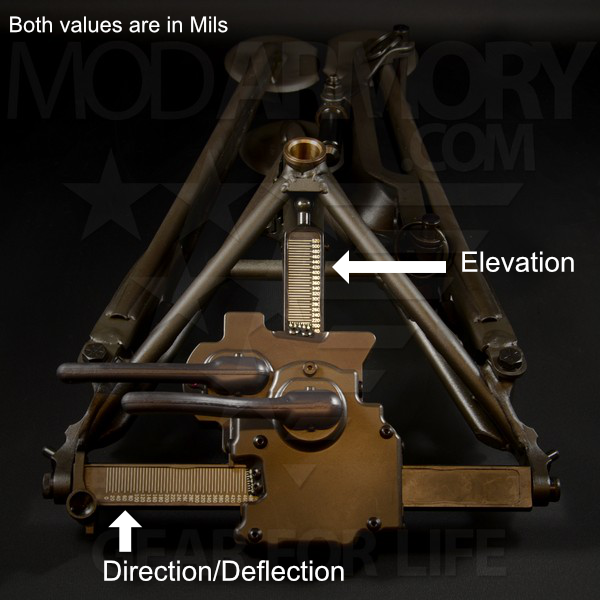
Notice those bars with lines at the top and bottom? This is where you get your Direction and Elevation values from! So, you pull on those levers so you can freely move the 240 and simply aim at one of your targets. Once your’e locked in you can get the Direction values from the bottom bar and the elevation values from the top bar. Both of these are measured in mils. In cases where you don’t have a tripod, then you would use your compass to get the direction and take your best guess with the elevation with single value increments.
As for the range, Use your best judgement and estimate the range to your targets. It won’t be perfect but try your best.
Example
Okay, I hope all of this is making more sense. Now let’s take a look at a filled out range card

And here is the range card I filled out.

let’s go over it section by section
Header Info
Here a filled out the squad, platoon and company i’m assigned to. The image shows a direction of 110 degrees, this is where my machine gun is pointed. I pulled out my compass and pointed at the same direction, the north seeking arrow settled at the bottom left so I put that as the magnetic north
Sketch Area
Here I simply draw what I see from a top down perspective. The rightmost solid line is my FPL and I mark it accordingly, the leftmost solid line is my left limit, and the dashed lines are my secondary sector of fire. I drew the symbol for a 240 machine gun on the dot, indicating my current location. Then I just simply drew what I saw with emphasis on the main targets. Compare the range card with the picture and you will see that they are somewhat similar
Data Section
This is where it gets a bit tricky. I set position ID to primary, used todays date and put 240B for weapon. I set the circle meter distance to 20m because the targets are quite close. Note that you can change this depending on what environment you’re in. Now, Let’s go over the targets. announcements
Note
For this scenario I do not have a tripod (or machine gun). So I am improvising with degree azimuths and eyeballing elevation. Under normal circumstance you would use the Mils measurement not degrees. And you would get both direction and elevation values from the tripod. The top bar gives you elevation, the bottom bar gives you direction both are in MILS
Target 1: This is my FPL line, there is no need for a direction so I just crossed it out. I eyeballed the elevation and set it as “+1”. I estimated the distance to 80m, Put 7.62 in the ammo box because the 240B shoots 7.62 ammo and wrote “FPL” for the description
Target 2: I noticed there was a tank and decided to mark it as a target. I used my compass and shot an azimuth to find the direction, it came back as 90 Degrees. The terrain is relatively flat so iI set elevation as “+0” as there is no elevation gain, Estimated range to 65m, ammo set to 7.62 and wrote “Tank” for the description
Target 3/4: I saw a small tower and a large building. So, I simply repeated the same steps I took when I identified the tank and go the direction, elevation and range
Remarks
I used this area as a map legend of sorts. and listed what each drawing meant. This is good practice as it lets others know exactly what is going on without guessing what each shape means.
And there we go! This is a fairly simple range card example but this is pretty much as complex as it will get for you (Unless you go infantry). During Advance Camp you will be tested on drawing a range card for a 240B machine gun with tripod.
Tip
If you are still confused about all of this, I have attached a video to help you out. It’s pretty similar on how you will be tested in Advance Camp
Closing
If all of this is still confusing to you, then that’s ok. It took me a while to grasp all of this. Once again think of it as a mini map and don’t overthink the little details