Medical
Battle Buddy, Are You Okay?
References: Soldier Combat Skills TC 3-21.75 | Ranger Handbook TC 3-21.76 | Warrior Skills Level 1 STP 21-1 SMCT

Overview
DO NOT GET SHOT. Okay, seriously now. The Army profession is a dangerous one, and you will inevitably encounter casualties during missions. Because of this, it is imperative that every soldier knows basic medical care and first aid — it saves lives.
This article covers common medical scenarios you may encounter during missions at CST. You will also be tested on proficiency in these skills during Warrior Tasks Day.
IFAK
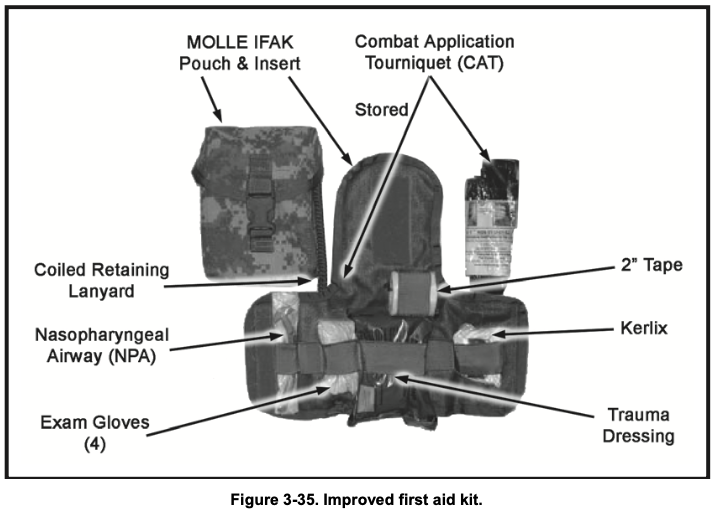
The Improved First Aid Kit (IFAK) contains these essential tools:
- Combat Application Tourniquet (CAT): Used to stop bleeding on arms and legs.
- Nasopharyngeal Airway (NPA): A tube inserted through the nose into the throat to keep the airway open.
- Kerlix (Gauze Bandage): Used to pack deep wounds and control bleeding; highly absorbent.
- Trauma Dressing: A large pad used to cover and compress wounds.
When tending to a casualty, always use the casualty’s IFAK instead of your own to preserve your supplies.
Added Tip: Familiarize yourself with your IFAK’s layout. In low-light conditions, practice accessing items by feel to save time during emergencies.
Tourniquet
This is a constricting band placed around an arm or leg to stop blood loss. Tighten it firmly — tourniquets can damage blood vessels and nerves if left on too long, potentially causing limb loss, so use them only when absolutely necessary. Once applied, seek medical help immediately.
Tourniquets save lives; knowing how to use one is essential for you and your battle buddies’ survival.
Quick chart on application:
Caution
Use ONLY on an arm or leg, AND only if the casualty is in danger of bleeding to death. Also, never loosen or release a tourniquet yourself after applying one — only medical professionals should do this.
Added Info: Apply the tourniquet 2–3 inches above the wound, but not over a joint. Mark the time of application on the casualty’s forehead with a “T” and the time (e.g., “T 1430”) for medical personnel.
Trauma Dressing
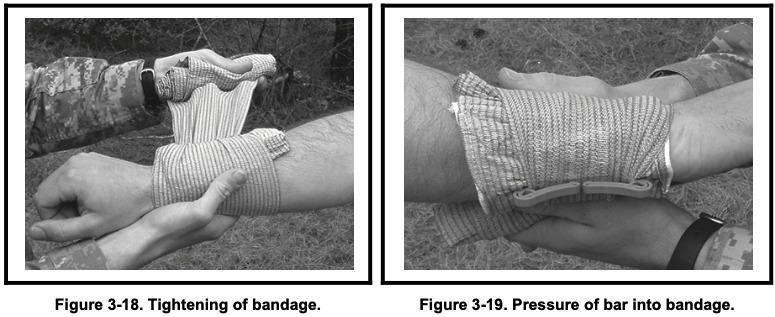
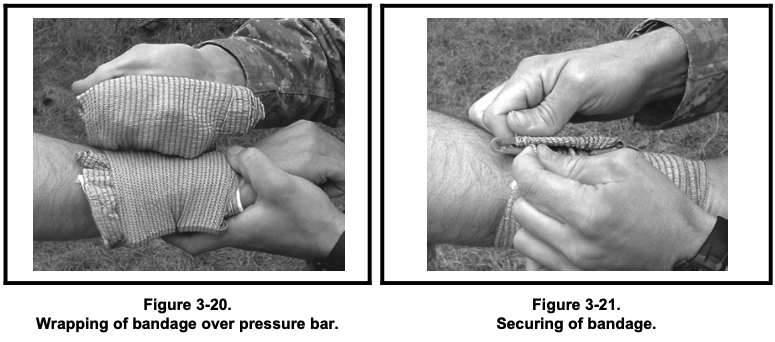
A large pad/band used to wrap around a wound. Wrap it around the wound and secure with the pressure bar.

Warning
Do not touch the white (sterile) part of the bandage.
Added Tip: If bleeding soaks through, apply a second dressing on top without removing the first. Elevate the wound if possible to reduce bleeding.
CLS and Techniques Overview
The CLS (Combat Lifesaver) is a nonmedical combat soldier. He does his soldering tasks first and helps the combat medic in emergency situations whenever it’s needed. A CLS receives enhanced first aid training and acts as the bridge between regular personal who know self aid and highly specialized combat medics.
Ideally, every member of a unit should be CLS-certified.
Casualty Assessment
Care should be rendered by a CLS or first responder after suppressing the enemy and eliminating immediate threats. Use the MARCH-PAWS acronym when assessing the casualty:
- Massive Bleeding: Use tourniquets or direct pressure to control life-threatening bleeding.
- Airway: Clear obstructions; use an NPA if needed.
- Respiration: Check for breathing; treat chest wounds with occlusive seals.
- Circulation: Reassess bleeding control and check for shock (pale skin, rapid pulse).
- Hypothermia/Head Injuries: Prevent heat loss; stabilize suspected head or spinal injuries.
After initial aid, monitor for:
- Pain: Manage with approved medications (e.g., combat pill pack).
- Antibiotics: Administer if wounds are contaminated.
- Wounds: Dress any additional injuries found.
- Splints: Splint fractures if present.
Overall, check for breathing, bleeding, and shock, and call for help.
Added Info: Always assess in a safe location. Log vital signs (pulse, respirations) every 5–15 minutes and report to medics.
Care Under Fire
The key tasks here are to stop major bleeding and evacuate the casualty from harm’s way ASAP.
This aid is rendered at the scene while under threat. Here are the basic steps:
- Achieve fire superiority.
- Provide immediate care to the casualty (control bleeding with a tourniquet).
- Evacuate the casualty from the scene.
Yell out to the casualty:
- “Can you return fire?”
- “Can you move to safety?”
- “Can you apply self-aid?”
If no signs of life: Tend to the casualty after the area is secure.
If signs of life: Instruct them to play dead while you neutralize the enemy.
Have someone provide security while you stop the bleeding. After controlling bleeding, move to a secure location, such as the Casualty Collection Point (CCP).
Evaluation
When being evaluated, keep this in mind:
-
First: Ensure straps are tightened and tied properly when using the sled. You will get a NO-GO if the casualty slips out.

-
Don’t forget the sled bag and the casualty’s weapon; place them in the sled so they do not fall out.
Added Tip: Practice drags with a buddy. Use low crawls if under fire to minimize exposure.
First Aid to Restore Breathing/Pulse
This involves using an NPA and CPR techniques to restore breathing.
The following video provides more detail on how you will be evaluated:
Added Info: If an NPA isn’t available, use the head-tilt/chin-lift method. Perform CPR at 30 compressions to 2 breaths; continue until help arrives or you’re exhausted.
Control Bleeding
This involves using combat gauze and dressings to wrap injuries.
The following video provides more detail on how you will be evaluated:
Added Tip: For junctional wounds (e.g., groin, neck), use hemostatic agents like Combat Gauze without a tourniquet.
Conclusion
Hopefully, you won’t have to perform any care in a real-world scenario. Nonetheless, knowing basic first aid is crucial. You will be evaluated at CST, so learn sooner rather than later.
I have attached the EIB standards below so you can know what to expect at CST.
EIB: Care Under Fire
Task: Perform care under fire. Transport and transfer a casualty.
Condition: You are a member of a team on a combat patrol that has come under sporadic small arms fire. You witness a teammate in the open receive a gunshot wound to the (Grader will state left or right) leg. Your teammate is struggling to reach his/her Combat Application Tourniquet (CAT) and you see bright red arterial bleeding. No spinal injury is suspected, and you are not in a CBRNE environment.
Standard: Perform Care under Fire, in sequence, within three minutes. Transport and Transfer, in sequence, within nine minutes. You must not cause further injury, have no safety violations, and not lose any equipment.
-
Return fire and take cover until fire suppression is achieved.
a. Candidate will return fire, move to cover, and yell distance, direction, and description.
b. Direct the casualty to return fire, move to cover, and administer self-aid to stop the bleeding. When the Candidate has demonstrated the proper techniques, the Grader will state “Fire suppression has been achieved”, or the enemy fire will stop.
c. Candidate states, “Cover me.” Grader will reply, “Got you covered.” -
Move the casualty, his/her weapon, and mission-essential equipment to cover using the Cradle-drop drag (below), or any appropriate technique, without causing further injuries or losing any equipment.
a. Position the casualty on their back and kneel down by the head of the casualty.
b. Slide the rescuer’s hands under the casualty’s shoulders with the palms facing upward to ensure a firm grip under the casualty’s armpit.
c. Stand-up halfway while supporting the casualty’s head on one forearm. Note: the elbows may also be brought together to allow the casualty’s head to rest on both forearms.
d. Lift the casualty while simultaneously dragging them backwards. -
Administer life-saving bleeding control by applying the CAT to the wounded extremity.
a. Place tourniquet over the clothing of bleeding extremity as high as possible (without capturing the shoulder or buttocks).
b. Route the band around the limb above the wound on the injured extremity.
c. Pass the red tip through the inside slit in the buckle then pull the band as tight as possible and secure the Velcro back on itself all the way around the limb, but not over the rod clips.
d. Twist the windlass until the bleeding stops. Candidate will verbalize this and will ensure to not overtighten if using an actual Soldier as a casualty.
e. Secure the windlass rod inside the windlass clip and lock it into place then continue to route the self-adhering band between the windlass clips and over the windlass rod. Secure the rod and band with the windlass strap, if possible.
f. Assess for absence of a distal pulse. Candidate should perform and verbalize with proper technique. Pulse must be taken with skin-to-skin contact and not using their thumb.
Added Note: If bleeding persists, apply a second tourniquet proximal to the first.
EIB: Restore Breathing and/or Pulse
Task: Perform first aid to restore breathing and/or pulse.
Condition: You are a member of a team on a combat patrol that has come under small arms fire. You witness a teammate receive a gunshot wound and collapse. The teammate is unresponsive. You are behind cover, not under hostile fire, and security has been established. You have a Combat Lifesaver (CLS) bag and are not in a CBRNE environment.
Standard: Perform all tasks to standard, in sequence, within five minutes, without causing further injury.
-
Check for responsiveness.
a. Ask in a loud, but calm voice, “Are you okay?”
b. Gently shake or tap the casualty on the shoulder.
c. Watch for response. Grader will state, “The casualty is unresponsive.” -
Position the casualty onto his/her back.
Note: If the casualty is in the prone position, roll him/her onto his/her back, or if in the supine position, raise the casualty’s left arm over his/her head to stabilize the body while performing first aid.
a. Kneel near the casualty with your knees near his/her shoulders (allows you to reach to the face, neck, and body, with minimal turning of the casualty and less spinal movement).
b. Place one hand on the back of the casualty’s head and neck.
c. With the other hand, grasp the casualty under the far arm (forearm to elbow).
d. Roll the casualty toward you onto his/her back. -
Open or clear the airway by using the head-tilt/chin-lift technique.
Caution: Do NOT use this method if a spinal or neck injury is suspected.
a. Grasp the casualty’s tongue and pull it forward.
b. Look in the mouth for airway obstructions.
c. Use a cross-finger technique to open the mouth by grasping the tongue and lower jaw between the index and thumb and lifting the lower jaw or lifting the chin while tilting the head back.
d. If a foreign object is visible, try to remove it (using any method).
Warning: Do NOT force the object deeper down the airway. Grader will state, “You do not see an object in the casualty’s mouth.”
e. One hand should be pressing on the casualty’s forehead and the other should be hooked under the jaw. Bring the chin forward.
Warning: Do NOT use the thumb to lift the lower jaw. Do NOT completely close the casualty’s mouth. Do NOT press deeply into the soft tissue under the chin with the fingers. -
Check for breathing while maintaining an airway.
a. LOOK for the chest to rise and fall.
b. LISTEN for air escaping during exhalation by placing your ear near the casualty’s mouth/nose.
c. FEEL for the flow of air on your cheek.
d. Perform rescue breathing if the casualty does not resume breathing spontaneously. Grader will state, “The casualty is not breathing.” -
If the casualty does not resume breathing, insert a nasopharyngeal airway.
a. Keep the casualty’s head tilted backward.
b. Lubricate the tube of the nasopharyngeal airway with water or saliva.
c. Expose the opening of the casualty’s nostril.
d. Insert it into the nostril with the bevel facing toward the septum.
e. Insert the airway into the nostril.
f. Insert NPA into the nostril and advance it until the flange rests against the nostril. Note: Never force the airway into the patient’s nostril. If resistance is met, pull the tube out and attempt to insert it in the other nostril.
g. Recheck breathing (per step 4). Grader will state, “Casualty is still not breathing.” -
Give breaths to ensure an open airway.
a. Maintain airway and gently pinch nose closed (covering the NPA), using the hand on the casualty’s forehead.
b. Take a normal breath and place your mouth, in an airtight seal, around the casualty’s mouth.
c. Give two breaths (1 second each), taking a breath between them, while watching for the chest to rise and fall and listening and/or feeling for air to escape during exhalation. Breaths should not be over-exaggerated or forceful. Grader will state, “The chest did not rise.”
d. Reposition the casualty’s head slightly farther backward and repeat the breaths. Grader will state, “The chest did not rise.” -
Perform chest compressions to clear the airway.
a. Kneel close to the side of the casualty’s body.
b. Locate the nipple line placing the heel of one hand on the lower half of the sternum (breastbone).
c. Place the heel of the other hand on top of the first hand on the lower half of the breastbone, extending or interlacing the fingers.
d. Straighten and lock the elbows with the shoulders directly above the hands.
e. Without bending the elbows, rocking, or allowing the shoulders to sag, apply enough pressure to depress the breastbone 1½ to 2 inches. Give compressions at a rate of 100 per minute (hard and fast at a ratio of 30 compressions to 2 breaths) with the intent of relieving the obstruction.
f. Look in the mouth for objects between compressions and breaths. After one round of compressions and breaths, the Grader will state, “You see an object in the casualty’s mouth.”
g. Remove the object. Candidate simulates using proper technique. -
Reopen airway and repeat the breaths (Steps 3, 4 & 6). Grader will state, “You see the chest rise and fall with your breaths, but the casualty is still not breathing.”
-
Check for a pulse for five to 10 seconds. Place tips of index and middle fingers in groove in casualty’s throat beside the Adam’s apple on the side closest to you. Do NOT use the thumb. Grader states, “You do not feel a pulse.”
-
Perform CPR.
a. Position your hands and body for chest compressions as in step 7.
b. Give 30 compressions.- Press straight down to depress the breastbone 1½ to 2 inches.
- Come straight up and completely release pressure on breastbone to allow chest to return to its normal position. The time allowed for release should equal the time required for compression.
- Give 30 compressions in about 23 seconds (at a rate of 100 per minute). Do NOT remove the heel of your hand from the casualty’s chest or reposition your hand between compressions. However, all pressure must be released from the chest cavity to allow for full chest wall expansion.
c. Give two breaths. - Open the casualty’s airway.
- Give two breaths (1 second each).
d. Repeat steps 10a-c for five cycles or two minutes. After one PROPERLY performed cycle, the Grader will state, “Two minutes has elapsed.” If the Candidate does not perform the steps properly within two minutes, they will be a NO-GO.
e. Reassess the casualty. - Check for the return of the pulse for 3 to 5 seconds. Grader will state, “You feel a pulse.”
- Check breathing for 3 to 5 seconds. Grader will state, “Casualty is not breathing.”
f. Give breaths at the rate of one every 5 to 6 seconds (10 to 12 breaths per minute). Note: Breaths should not be over-exaggerated or forceful. After the Candidate has demonstrated PROPER performance, Grader will state, “Two minutes has elapsed.” If the Candidate does not perform the steps properly within two minutes, they will be a NO-GO.
g. Recheck for pulse and breathing. Grader will state, “The casualty is breathing and conscious.”
-
Place the casualty in the recovery position (by rolling them as a single unit onto their left side, placing the hand of their upper arm under their chin, and flexing their upper leg) until help arrives. Watch the casualty closely for life-threatening conditions, maintain an open airway, and check for other injuries.
-
Candidate will state that if the casualty’s condition deteriorates, they will continue CPR until:
a. The breathing and pulse returns.
b. They are relieved or stopped by a qualified person.
c. They are physically unable to continue.
EIB: Control Bleeding
Task: Evaluate a casualty using Tactical Field Care and control bleeding.
Condition: You are a member of a team on a combat patrol that has come under small arms fire. You witness a teammate in the open receive a gunshot wound to the (Grader will state the extremity). Your teammate was able to apply their own Tourniquet, move to you, and is responsive. You are behind cover, not under hostile fire, and security has been established. You have a Combat Lifesaver (CLS) bag and are not in a CBRNE environment.
Standard: Perform all tasks to standard, in sequence, within five minutes, without causing further injury.
-
Perform a blood sweep of the extremities, neck, armpits, and groin areas. Expose wounds if bleeding is detected. If the second wound is not simulated, the Grader will identify the location during the blood sweep. If the Candidate fails to sweep that area or detect the wound, they are a NO-GO.
-
Reassess any tourniquets placed during Care under Fire to ensure they are still effective. Grader will state, “The wound spurts blood when the limb is moved.”
a. Attempt to further tighten the CAT until bleeding stops. Candidate will verbalize this and will ensure to not overtighten if using an actual Soldier as a casualty. Grader will state, “The CAT is still ineffective.”
b. Place a second CAT, from the casualty’s IFAK, side-by-side but above the other tourniquet.- Route the band around the limb side-by-side but above the first tourniquet.
- Pass the red tip through the inside slit in the buckle then pull the band as tight as possible and secure the Velcro back on itself all the way around the limb, but not over the rod clips.
- Twist the windlass until the bleeding stops. Candidate will verbalize this and will ensure to not overtighten if using an actual Soldier as a casualty.
- Secure the windlass rod inside the windlass clip and lock it into place then continue to route the self-adhering band between the windlass clips and over the windlass rod. Secure the rod and band with the windlass strap, if possible.
- Assess for absence of a distal pulse. Candidate should perform and verbalize with proper technique. Pulse must be taken with skin-to-skin contact and not using their thumb.
- Place a “T” and the time of the application on the casualty with a marker (provided in casualty’s IFAK). This can be simulated and verbalized, or a piece of lamination can be applied to the casualty’s forehead so each Candidate can perform the task.
- Secure the CAT in place with tape (provided in casualty’s IFAK) using one full wrap.
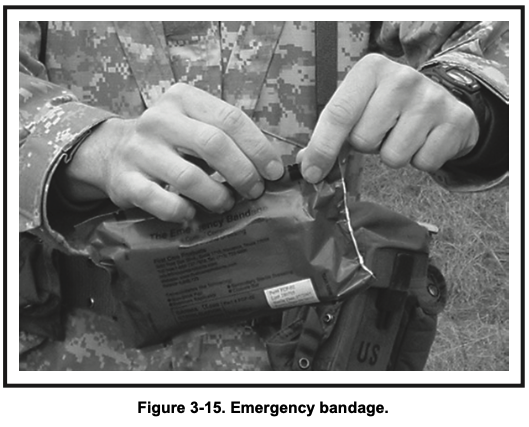
c. Apply an emergency bandage. - Place the white portion of the bandage down covering all the wound.
- Wrap the elastic portion of the bandage around the extremity and insert it into the pressure bar. Pull the bandage in the opposite direction and apply pressure with the pressure bar over the wound and continue to wrap the wound tightly ensuring all edges of the wound pad are covered. Note: Ensure bandage is applied firmly enough to prevent slipping without causing a tourniquet-like effect.
- Secure the closure bar of the bandage.
-
Apply a hemostatic dressing to the major non-arterial wound that is bleeding heavily.
a. Expose the wound by opening or cutting away the casualty’s clothing or equipment.
b. Pack Combat Gauze tightly into the wound over the site most actively bleeding. Note: If possible, remove excess blood from the wound with a cotton gauze while preserving any clots that may have formed.
c. Pack the wound with the entire dressing.
d. Apply direct pressure for 3 minutes; periodically check dressing to ensure placement and bleeding control. When performed correctly, Grader will state, “Three minutes has elapsed, and wound is still bleeding.”
e. Pack second Combat Gauze into wound. When performed correctly, Grader will state, “Bleeding is under control.”
f. Secure the hemostatic dressing in place with a pressure dressing (as per steps c1 – c3 above).