Land Navigation - Maps and Plotting
No GPS? No Problem!
References: TC 3-25.26 | Land Navigation Website

Overview
The art of landnav involves proper usage of a map, protractor, and compass to correctly plot your points and proper step discipline and sense of direction to actually find your points.
It’s quite involved and there are a lot of moving pieces, nonetheless it’s something that can be learned and a skill that only gets better with practice
As a Cadet, you will engage in extensive land navigation (landnav) training. Mastering this skill is crucial, as it is a significant component of Cadet Summer Training (CST) and every Field Training Exercise (FTX) you will experience.
In this article we will focus on the map itself along with plotting, the practical part of actually finding your points will be on a separate article
Reading The Map
We use Topographic maps, these maps help us identify terrain features and have a general understanding of our environment
To identify map features, use the map legend.

The map legend helps you identify major features on the map and their meanings. You can use these features to your advantage when locating points.
Map Colors
Map colors have specific meanings. Here are the common colors you will encounter and their typical significance:
- Black: Man-made features (e.g., buildings) and minor roads.
- Red: Cultural features (e.g., towns, populated areas), main roads, and boundaries.
- Blue: Water features (e.g., lakes, swamps, rivers).
- Green: Dense vegetation.
- Red-Brown: Relief features related to elevation, such as cliffs.
Topographic Symbols
Maps include various symbols and markings. Here are some common ones you may encounter:


Map Data
Each map includes important data surrounding the map itself, which you will use when plotting points.


Contour Lines
The lines on the map are contour lines, representing elevation. They typically indicate a round number, such as 100 meters per line.


Terrain Features
You may encounter various terrain features depending on your location. These features can help you identify your current position and locate points.
Major Terrain Features
Use the acronym “Hidden Valley Ranch Salad Dressing” to remember the five major terrain features:
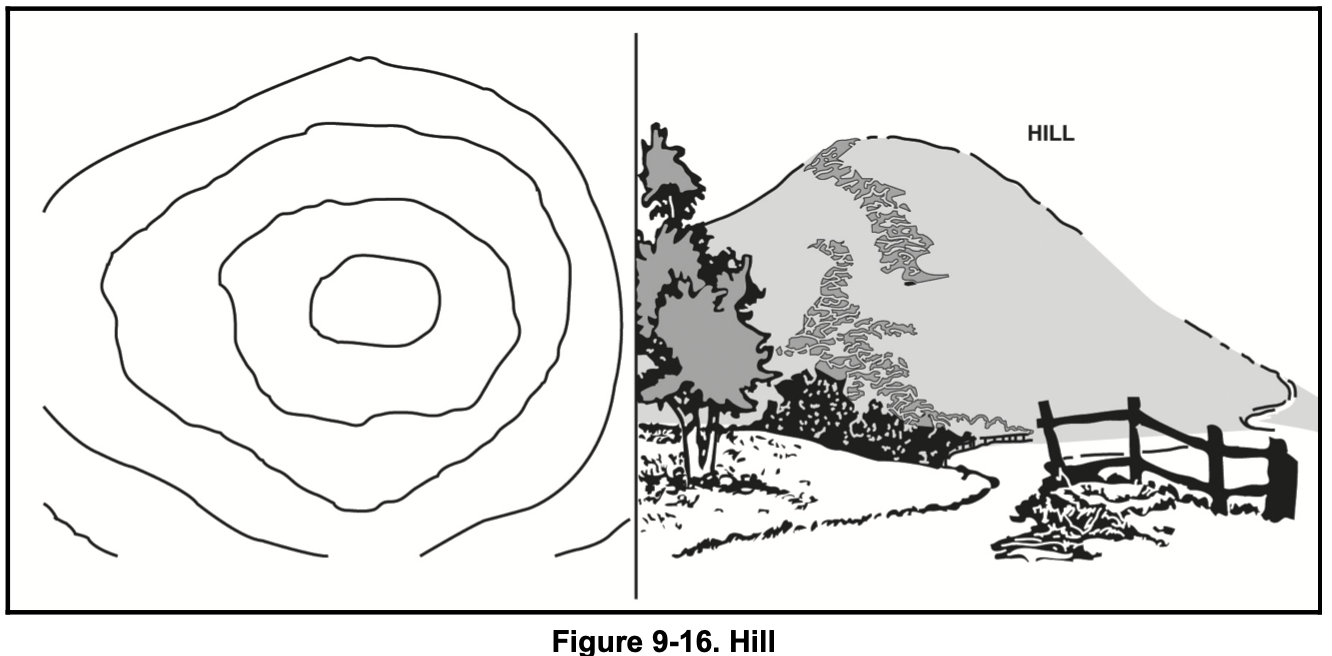
- Hill: A point or small area of high ground.
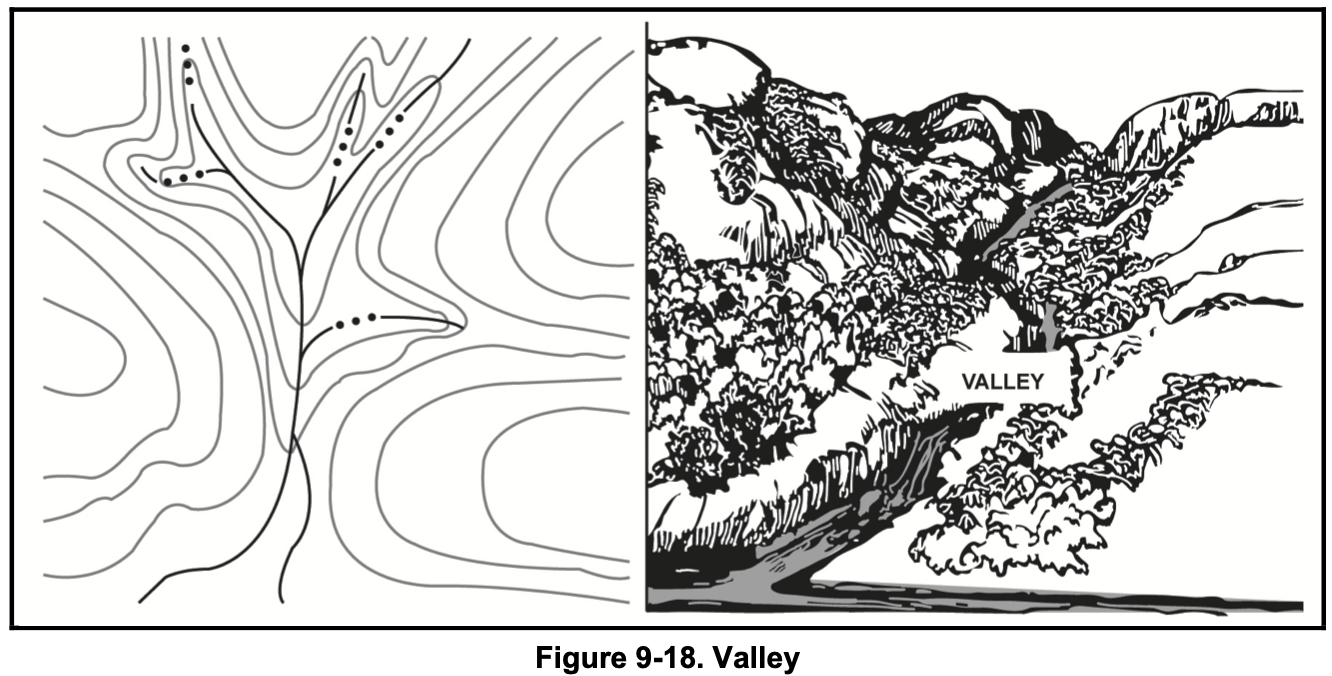
- Valley: Reasonably level ground bordered on the sides by higher ground.
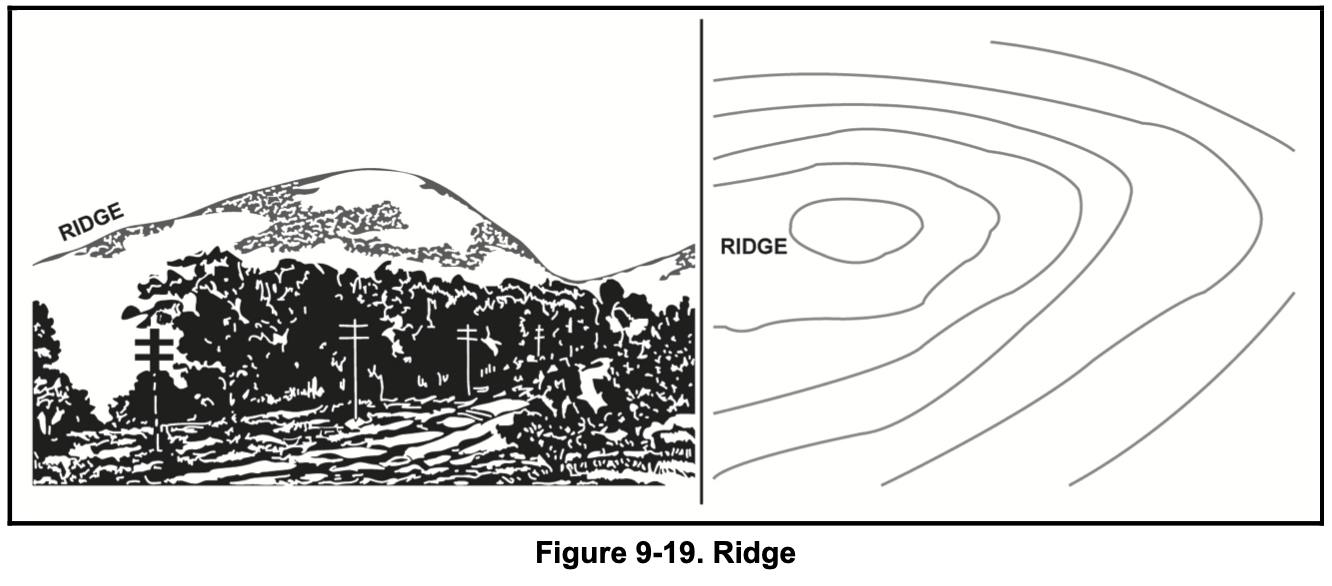
- Ridge: A line of high ground with height variations along its crest.
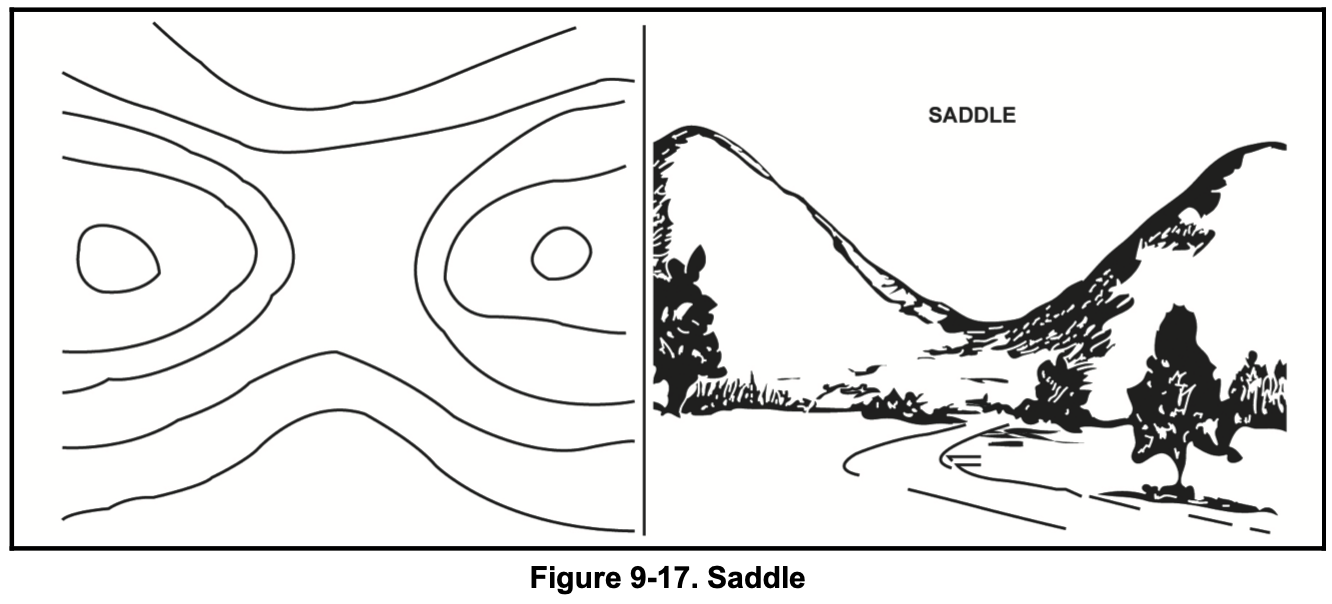
- Saddle: A dip or low point along the crest of a ridge.
- Depression: A low point or hole in the ground, surrounded on all sides by higher ground.

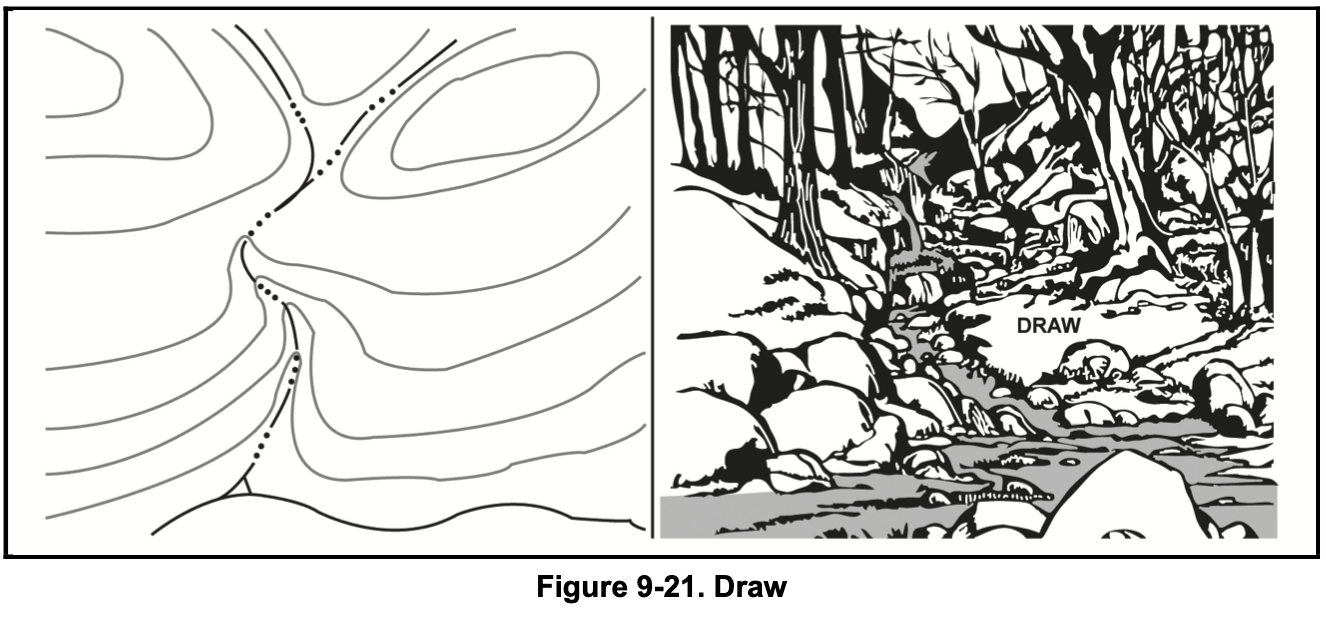
Minor Terrain Features
- Draw: Similar to a valley but less developed.
- Spur: A usually short, continuously sloping line of higher ground.
- Cliff: A vertical or near-vertical slope.

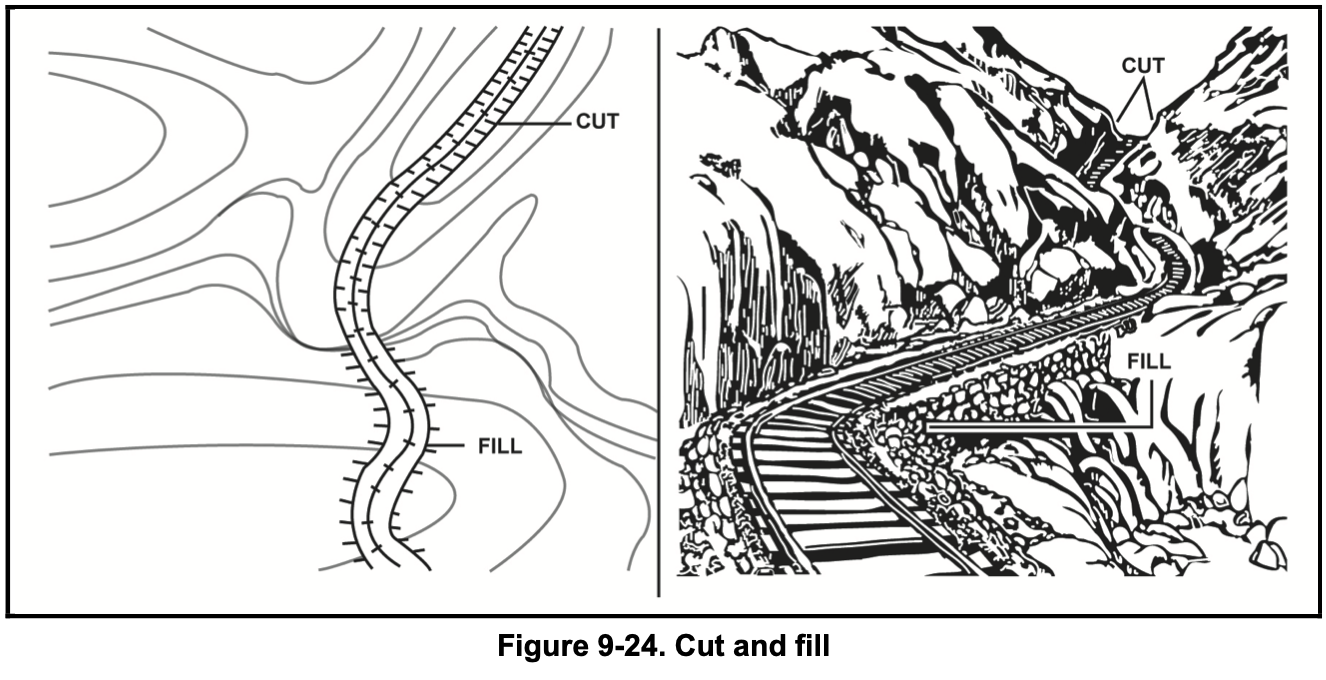
Supplementary Terrain Features
- Cut: A feature where terrain has been excavated.
- Fill: A feature where terrain has been built up.
Plotting Points
Now, let’s discuss plotting points. You will receive a coordinate grid (usually 8 digits), e.g., EG 7833 9821. This 8-digit number and designator (EG) marks a specific point on the map. Here’s how to find and plot it.
The Protractor
To plot points, you will need a protractor.

The protractor includes measurements in mils and degrees; you will use degrees. Mils are more precise and are often used by field artillery units.
The protractor has three triangles, corresponding to different scales: 1:25,000, 1:50,000, and 1:100,000. Your map will indicate its scale. Ensure you use the correct triangle and scale, or you will plot points incorrectly.
Plotting the Point
Suppose you’ve been given the coordinate EG 8824 0450.
When plotting, the rule of thumb is to read right then up. The bottom-left corner of the grid square identifies the first two digits (88__ 04__). These numbers are found on the map itself. The last two digits (__24 __50) are found using the protractor.
- On the map, locate the numbers at the top or bottom, reading from left to right. For the coordinate starting with “88,” find the 88 line and align your protractor on it.
- Next, find the numbers on the sides of the map, reading from bottom to top. The fifth and sixth digits are “04,” so slide the protractor down until it aligns with the 04 line.
- With the protractor aligned to the bottom-left corner of the grid square, locate the inner numbers (__24 __50). To find “24,” slide the protractor along the horizontal line until it rests between the “2” and “3” marks on the protractor.
- Then, locate “50” on the vertical scale of the protractor. This intersection is your point. Mark it with a pencil, and you’re done. You have successfully plotted EG 8824 0450.

The Compass
Now, let’s review how to use the compass.

You will use a lensatic compass to shoot azimuths (directions, e.g., 230 degrees) and determine your heading.
Important
The lensatic compass is sensitive to magnetic interference. Keep it away from phones, watches, weapons, and other metal objects when reading it, as these can affect the azimuth and lead you in the wrong direction.
Reading the compass is straightforward: keep it level and steady, and it will indicate the direction you are facing. Here are two common holding techniques:


Finding the Direction
To determine your direction, you first need to know your current location. For simplicity, assume you’ve been given your current location and have plotted your destination point.
- Start by orienting your map to face north, using your compass to assist.
- Align your protractor with the center of your known location.
- Slide a sheet of paper under the protractor and align it to create a straight line between your current location and your plotted point. This line will correspond to a degree measurement on the protractor. Record this as your grid azimuth.

- To use this azimuth, convert it to a magnetic azimuth, or you will travel in the wrong direction. The map provides conversion instructions (e.g., GM angle).
With the magnetic azimuth calculated, following it will lead you to your point.
Finding the Distance
To avoid overshooting your target, you need to determine the distance to your point.
Use the map’s built-in scale or the protractor. Align the protractor with the center of your known point, as you did for finding the direction. This time, use the scale to measure the distance in meters.

