Claymores
FRONT TOWARD ENEMY
References: TC 3-22.23 | EIB Standards

Overview
During CST, one of the lanes you will be graded on will be the Claymore lane. There are a lot of steps involved, and you must do everything in sequence to receive a “GO.” It’s one of those things you need a lot of practice on and muscle memory to complete; just the slightest thing can end you in a “NO GO.” You will also be employing Claymores during the animal phases at CST, so it’s imperative that you know how to do this.
The Claymore Itself
Say hello to the M18A1 Antipersonnel Claymore Mine. This little thing can fire hundreds of steel balls explosively at an effective range of 100m. Being in front of this thing when it goes off is not a great idea, and it’s also not a great idea to be behind it, as there can be some damage done there too. These are often used to trigger ambushes and other platoon attacks. It is extremely effective against infantry units and can also work on unarmored vehicles.
Components
For the rest of this guide, we will be focusing on the Claymore mine with the M57 firing device, AKA electrical initiation. There is also a non-electrical initiation method, but we won’t be focusing on that.

- M18A1 Claymore Mine
- M4 Electrical Blasting Cap Assembly
- M57 Firing Device
- M40 Test Set
- M7 Bandolier
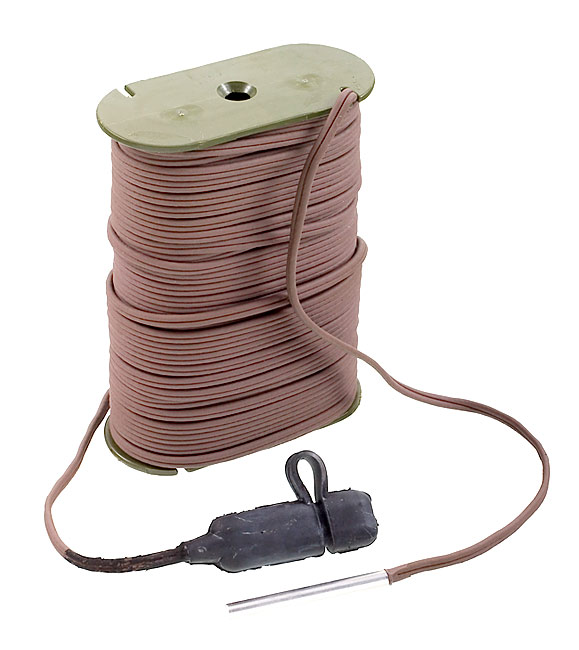
M18A1 Claymore Mine
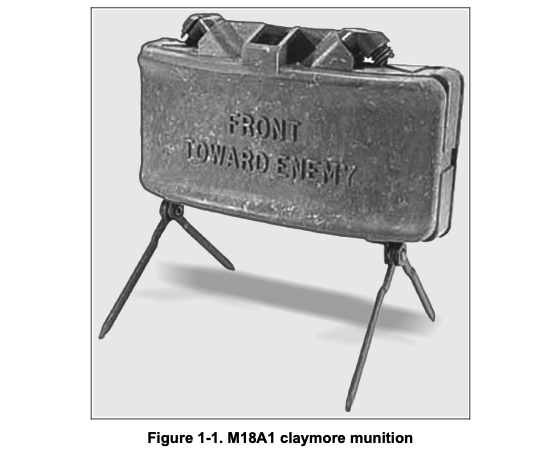 This is the Claymore itself. Be sure to point it in the right direction: “Front Toward Enemy.”
It weighs around 3 pounds, has retractable stakes, and an aiming sight at the top.
This is the Claymore itself. Be sure to point it in the right direction: “Front Toward Enemy.”
It weighs around 3 pounds, has retractable stakes, and an aiming sight at the top.
Caution
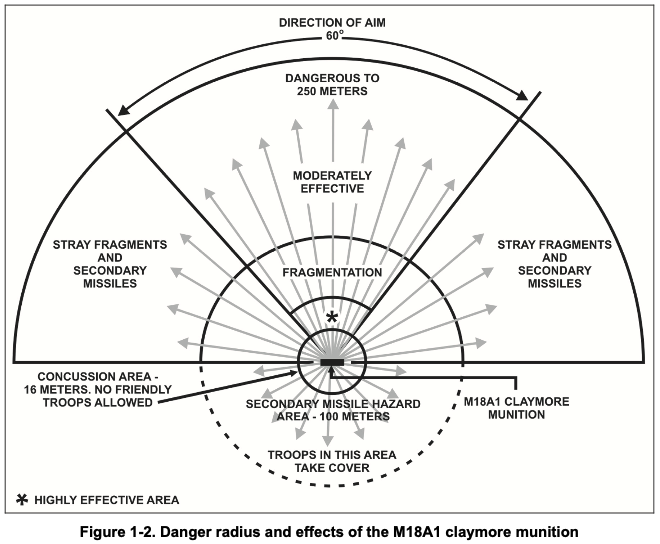
The minimum safe operating distance is 16 meters. No friendly forces should be within that radius. The operator and all friendly troops must take cover within 100 meters of said Claymore upon detonation.
Those small things on the side on the top of the Claymore are called the Shipping Plugs. Untwist and invert them when inserting the blasting cap inside the Claymore.
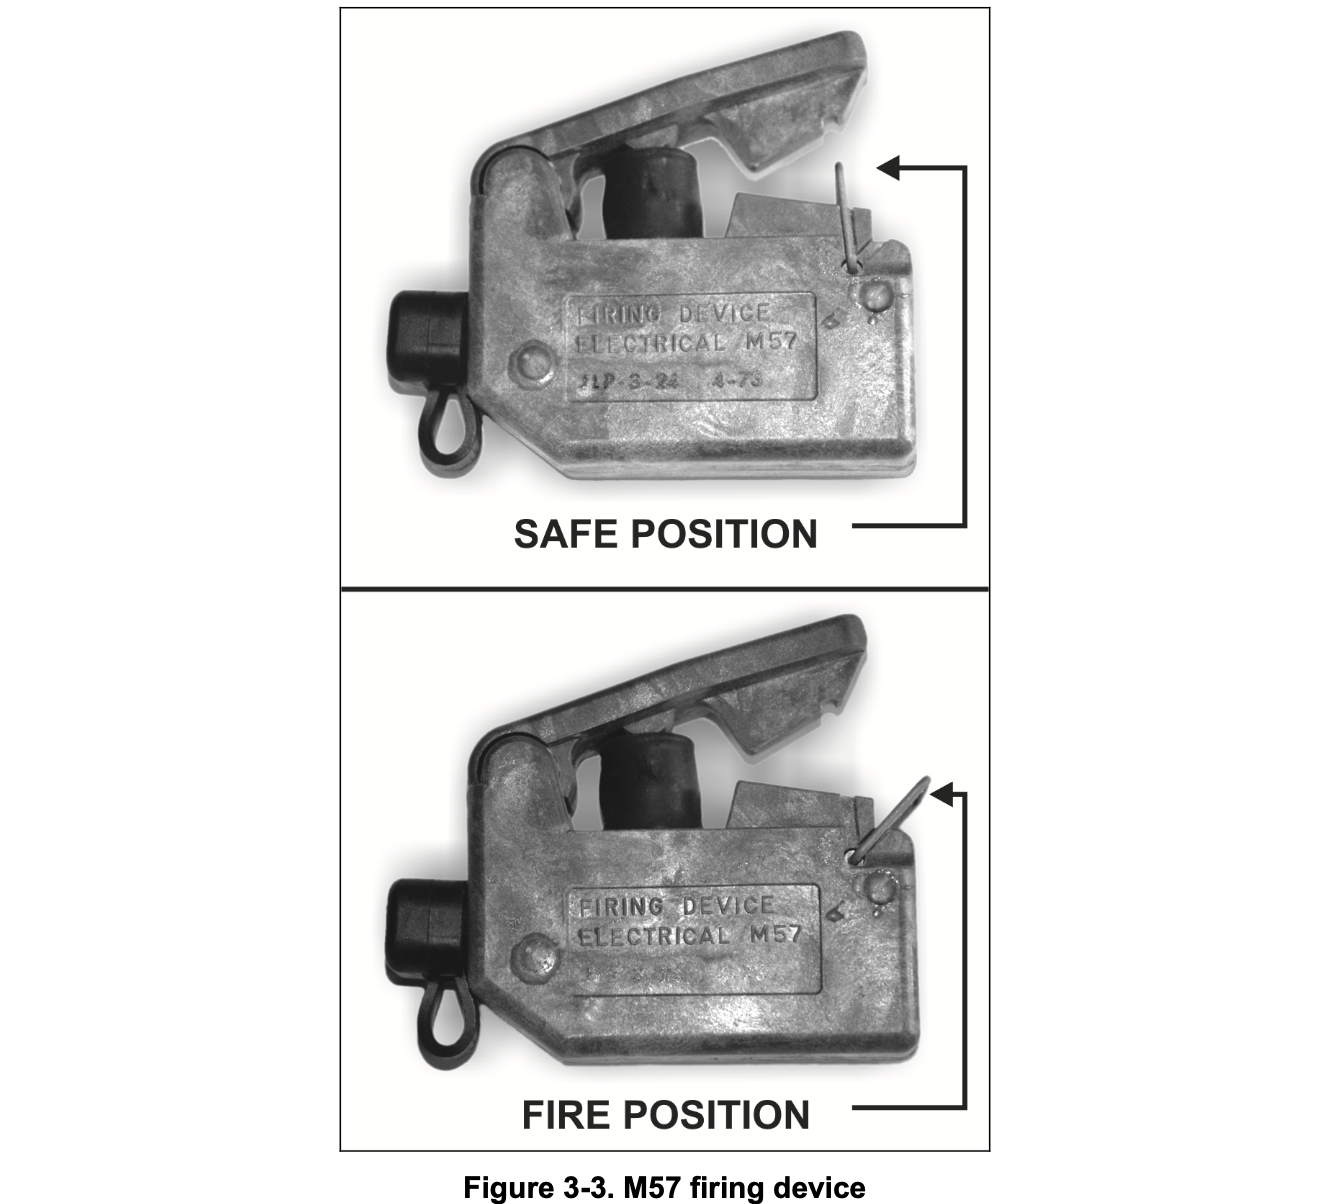
M57 Firing Device
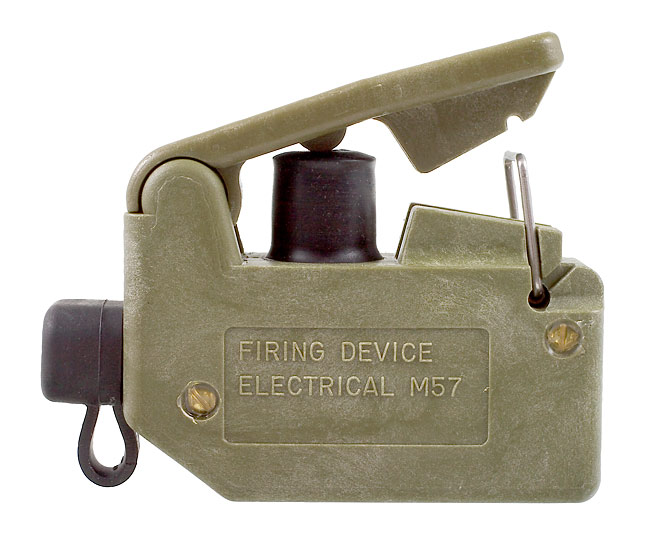 A handheld pulse generator that emits electrical sparks to make the Claymore go boom. There is a safety switch on this. Make sure it’s set on SAFE at all times when not in use.
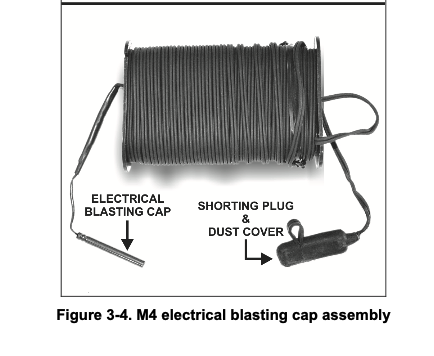
M4 Electrical Blasting Cap Assembly
 This contains the blasting cap, firing wire, and shorting plug. One end plugs into the Claymore, while the other end plugs into the firing device.
Warning
Do not let the blasting cap touch the floor; this is an immediate “NO GO” when being evaluated. Keep the dust cover on the shorting plug when not in use.
M40 Test Set
 Your test set. This plugs into the firing device and shorting plug from the blasting cap assembly. Used to test the wire so the Claymore blows up when you want it to. Keep the dust covers on when not in use!
There is a little window you can look through. It will emit a spark if things are working properly.
M7 Bandolier
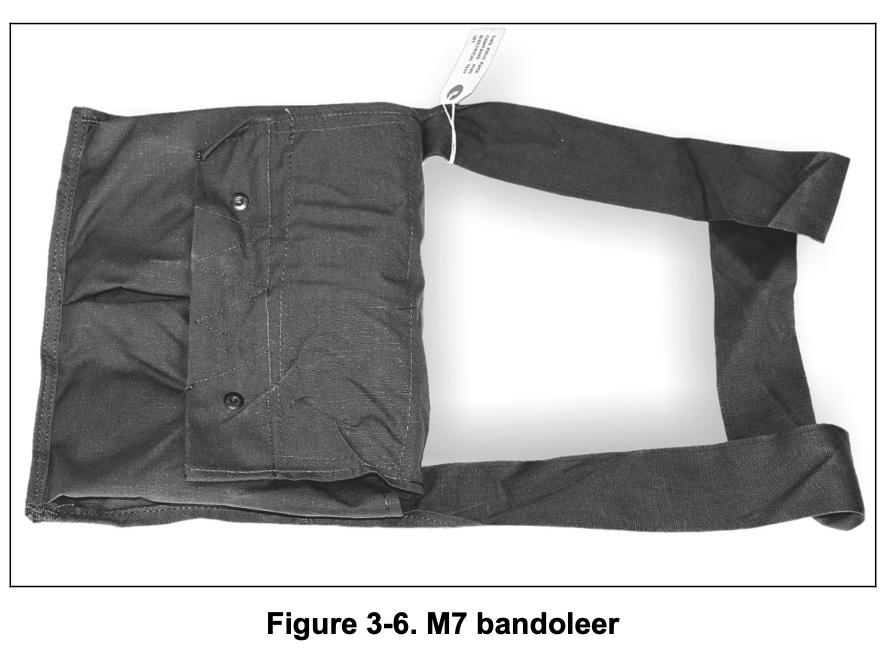 The bag that carries all of your Claymore stuff. Not much to it.
Setting It Up
There is a whole procedure you must go through when being evaluated, and everything must be done in sequence. All of those details will be down below; for now, I will focus on the bigger steps.
Circuit Test
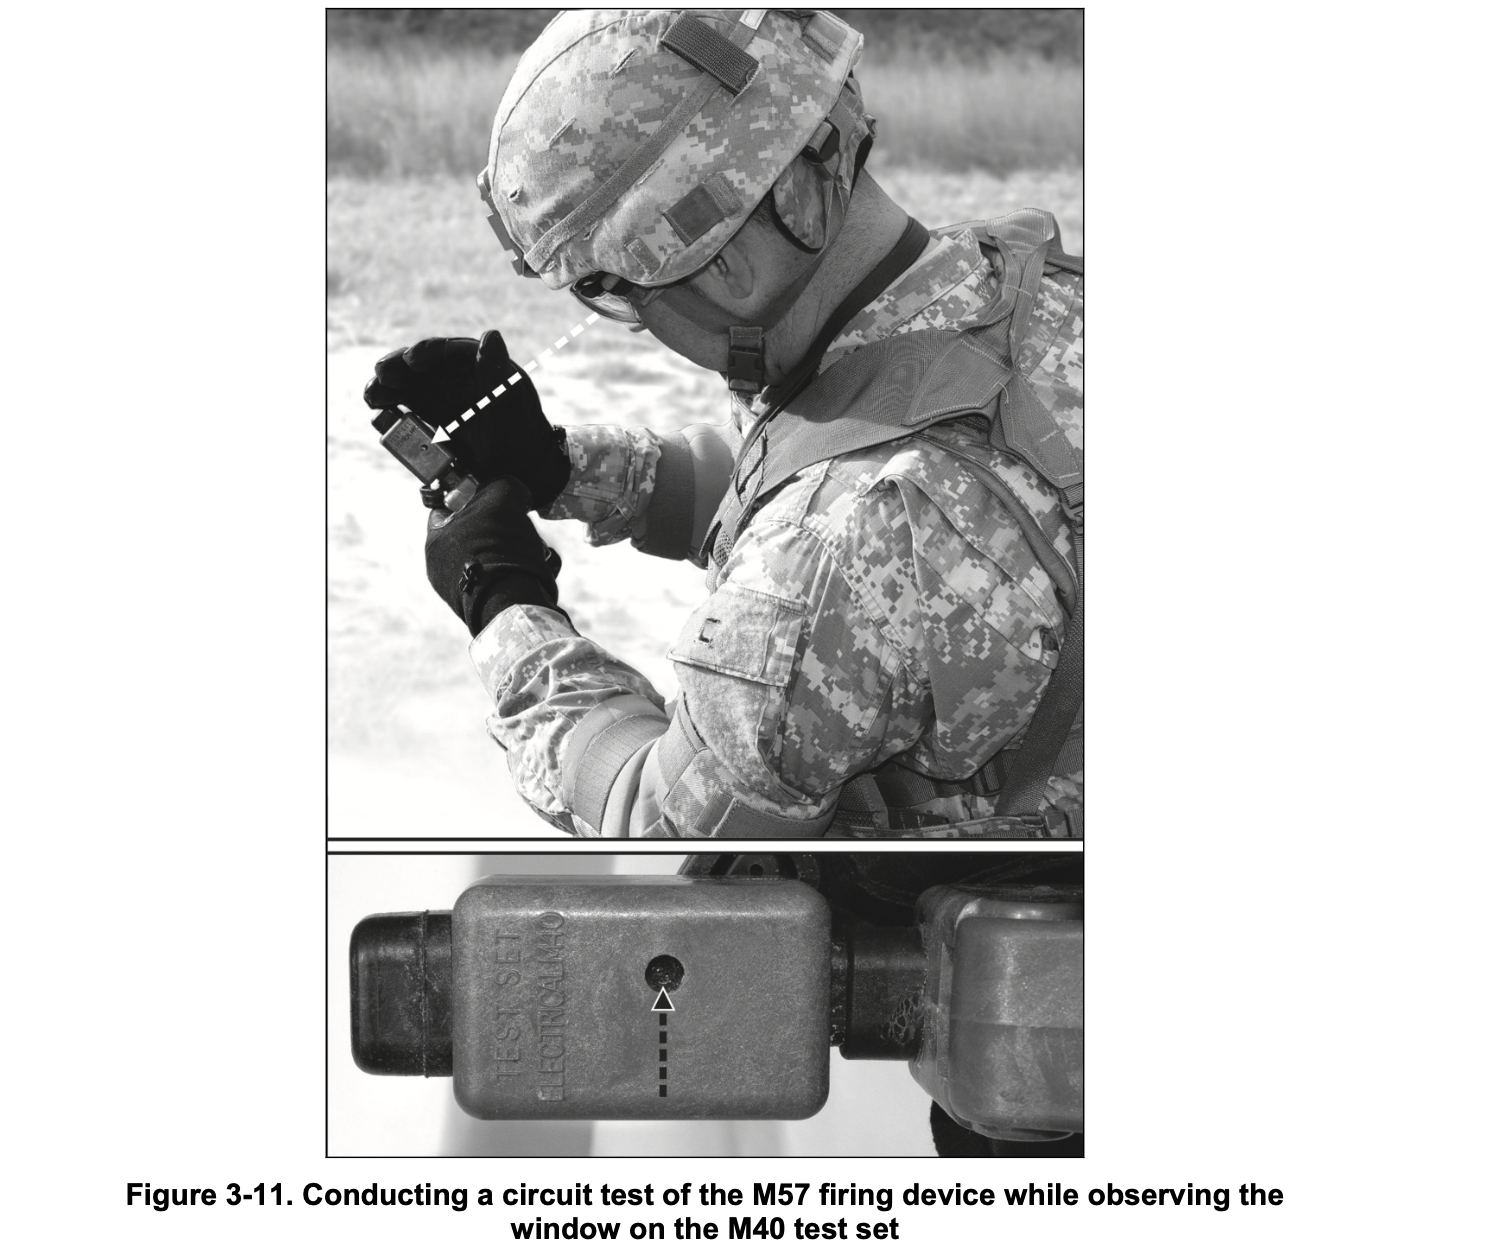 To perform a circuit test, plug in the test set to the firing device. Set the firing device to fire and squeeze the trigger.
There should be a spark in the little window, and you will yell, “I SEE THE LIGHT!”
To perform a circuit test, plug in the test set to the firing device. Set the firing device to fire and squeeze the trigger.
There should be a spark in the little window, and you will yell, “I SEE THE LIGHT!”
Warning
When doing this, the blasting cap assembly (spool) should be under the sandbag; failure to do this will result in a “NO GO.”
Inserting the Blasting Cap in the Claymore
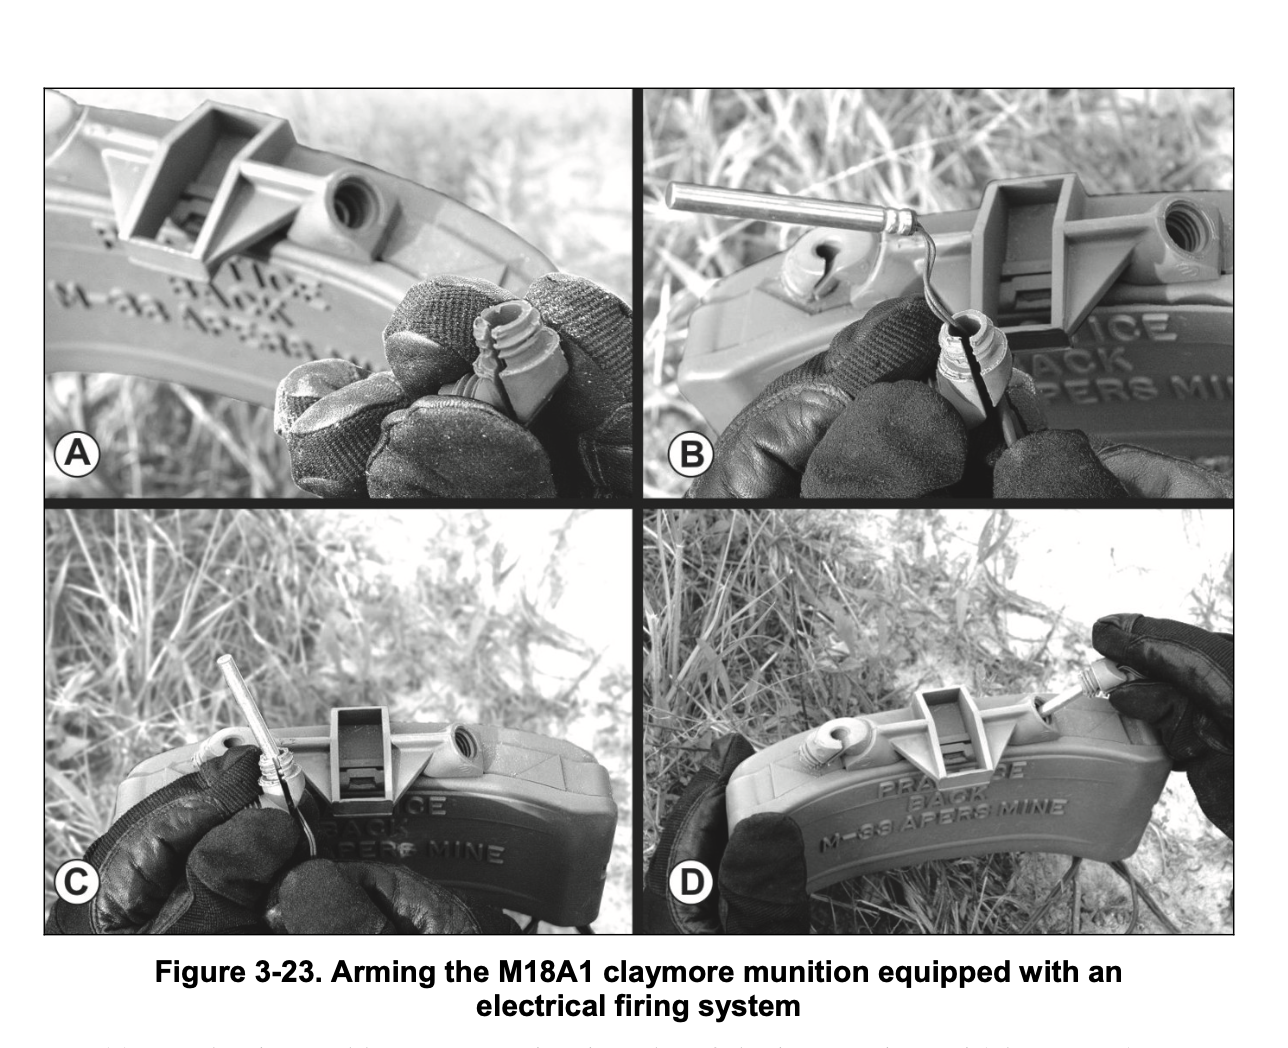 Simply unscrew the shipping plug and insert it through the hole. At no point should the blasting cap touch the floor.
EIB Standard
Below are all the steps, according to EIB standard. Everything must be done in sequence. CST warrior task lanes reflect EIB, so it’s recommended that you do things to the EIB standard.
I recommend watching this video and following along with the text instructions.
Task: Employ a Claymore mine. Recover a Claymore mine.
Condition: You are a member of a platoon in a patrol base in a non-CBRNE environment. You have been directed to utilize a Claymore mine to enhance the perimeter defense. There is a known enemy presence.
Standard: Correctly employ and fire a Claymore mine, in sequence, within 10 minutes. Correctly recover an unfired Claymore mine, in sequence, within five minutes.
Emplace and Fire:
-
Inventory the components: M57 firing device, M4 electric blasting cap assembly, M40 test set, and M7 bandolier.
-
Select a firing position that offers cover and unobstructed observation of the site selected for emplacing the munition.
-
Prepare the munition for employment. a. Place bandolier on shoulder or around neck. b. Ensure that the munition and all accessories are in the bandolier. c. Perform circuit test on the M57 firing device. d. Remove the M57 firing device (ensuring it is on SAFE) and the M40 test set from the bandolier. e. Remove the dust cover from the connector of the M57 firing device. f. Remove the dust cover from the female connector of the M40 test set. g. Plug the M40 test set into the M57 firing device. h. Move the firing device bail to the FIRE position. i. Depress handle of firing device with a firm, quick squeeze, observing flash through window of test set. Candidate states, “I see the light.” Operator holds window near eye and shades with other hand. j. Move firing device bail to SAFE position. Place firing device with test set attached in the bandolier. k. Remove the M4 electrical blasting cap assembly from bandolier. Remove twist tie from spool. l. Starting at the shorting/dust cover end of the electrical wire, uncoil approximately 1 meter of wire. m. At the 1-meter mark, fold the firing wire to create a loop with a large enough circumference to go around a stake or a fixed object at the firing position. Twist the wire loop over the index and middle fingers of the right hand. Push the loop through the circle created in the previous step. n. Secure the firing wire from the blasting cap side of the munition to a stake or a fixed object at the firing position. o. Uncoil enough wire to place the spool out of sight. Place the remaining spool of wire (with the blasting cap inside the spool) under a sandbag, behind a tree, or in a hole in the ground. p. Remove the M57 firing device with the M40 test set attached from the bandolier. q. Remove the shorting plug/dust cover from the connector of the firing wire. r. Remove the shorting plug/dust cover from the end of the test set. s. Plug the connector of the firing wire into the test set. t. Move the firing device safety bail to the FIRE position. u. Depress handle of firing device with a firm, quick squeeze, observing flash of light through window of test set. Candidate states, “I see the light.” When squeezing handle, an indicator lamp in window of test set flashes. This flash indicates that blasting cap circuitry is satisfactory. v. Place firing device on SAFE. Disconnect test set from firing wire; replace shorting plug/dust covers. w. Disconnect test set from firing device and replace dust covers. Repack in bandolier. x. Remove spool/firing wire/blasting cap from barrier used during circuit testing and walk tactically while unrolling wire from firing position to site selected for munition. Lay spool (with the blasting cap inside) down within arm’s reach of the munition emplacement site. y. Assume a prone position and remove munition from bandolier. Open legs to a 45-degree angle facing front/rear. z. Ensure face of munition marked ‘FRONT TOWARD ENEMY’ and arrows on top of munition point to enemy. aa. Push legs into ground with munition facing direction of fire. In windy areas or when legs cannot be pressed into ground, spread them as far as they will go so they are facing front/rear and mine will not tip.
-
Aim the munition. a. Select an aiming point at ground level in front of the munition. b. Position one eye about six inches to the rear of the sight. c. On knife-edge sight, align two edges of sight with aiming point. On slit-type peep sight, align groove of sight in line with aiming point that is two and a half meters off ground. Aiming point should be in center of area of coverage, with bottom edge of peep sight parallel to ground that is to be covered with fragment spray. d. Aim the munition by aligning the two edges of the sight with the aiming point.
-
Arm the munition. a. Remove the blasting cap from the spool’s cavity. Secure the firing wire approximately one meter from the blasting cap side of the munition to a stake, a stone, gravel, a sandbag, or another available means. b. Hold the blasting cap against the center of the chest with the left hand. c. Encircle firing wire at base of the blasting cap with the index finger and thumb of the right hand. d. While holding right hand to chest, extend left hand to arm’s length, pulling firing wire through fingers of right hand. Lock the elbow and pull all slack from the firing wire. e. Place the blasting cap back into the spool’s cavity until ready to fire. f. At one meter mark, fold firing wire to create a loop with a large enough circumference to go around stake. g. Twist loop over index/middle fingers of right hand. Push loop through circle created during previous step. h. Secure the firing wire from the blasting cap side of the munition to a stake or a fixed object at the munition emplacement site. This prevents the munition from being misaligned if the firing wire is disturbed. i. Unscrew/invert shipping plug priming adapter nearest stake or anchor. Remove blasting cap from spool. j. Slide slotted end of shipping plug adapter approximately one inch onto firing wire between crimped connections and blasting cap. Pull wire through slotted end of adapter until top of blasting cap is firmly seated in bottom portion of shipping plug adapter. Screw adapter, with blasting cap, into detonator well. k. Recheck the aim of the munition to ensure that the point of aim has not changed.
-
Camouflage the munition and firing wire while moving tactically back to the firing position.
-
Seek cover. Remove firing device and test set from bandolier; remove dust covers. Plug test set into firing device.
-
Remove shorting plug/dust cover from connector of firing wire and from end of test set.
-
Plug connector of firing wire into test set. Move firing device safety bail to FIRE position.
-
Place the eye near the window of the test set and squeeze the handle of the firing device quickly to observe the indicator lamp flashing through the window of the test set. Candidate states, “I see the light.”
-
Move the firing device bail from FIRE position to the SAFE position.
-
Disconnect test set from firing wire and replace the firing wire and the test set shorting plug/dust covers.
-
Disconnect test set from firing device and replace test set dust covers. Repack test set into bandolier.
-
Fire the munition. a. Remove shorting plug/dust cover from end of firing wire. Connect the firing device to the firing wire. b. State, “CLAYMORE” twice. Move firing device safety to FIRE and quickly squeeze handle.
Recover an Unfired Mine:
- Disarm the mine. a. Ensure firing device safety bail is in SAFE position. Disconnect firing device from the firing wire. b. Replace shorting plug on firing wire and dust cover on firing device. Place firing device in bandolier. c. Remove firing wire from stake or anchor at firing position.
- Recover the mine. a. Walk tactically to mine, assume a prone position, and check for booby traps and tampering. b. Remove shipping plug from detonator well. Separate shipping plug priming adapter from blasting cap. c. Pick up the spool and insert the blasting cap inside it. Place the spool back on the ground. d. Reverse the shipping plug and screw the plug end of the adapter into the detonator well. e. Lift mine from emplacement and secure legs. Repack mine and all accessories into bandolier. f. Remove the firing wire from the stake, anchor, or base of the emplaced munition. g. Pick up the spool. Wrap the firing wire on the spool as you move back to the firing position and secure the shorting plug and dust cover inside the spool. Ensure all components are packed in the bandolier.
Conclusion
I know it’s a lot, but everything must be done in sequence. Keep this in mind when evaluating. With enough practice, it should become second nature.