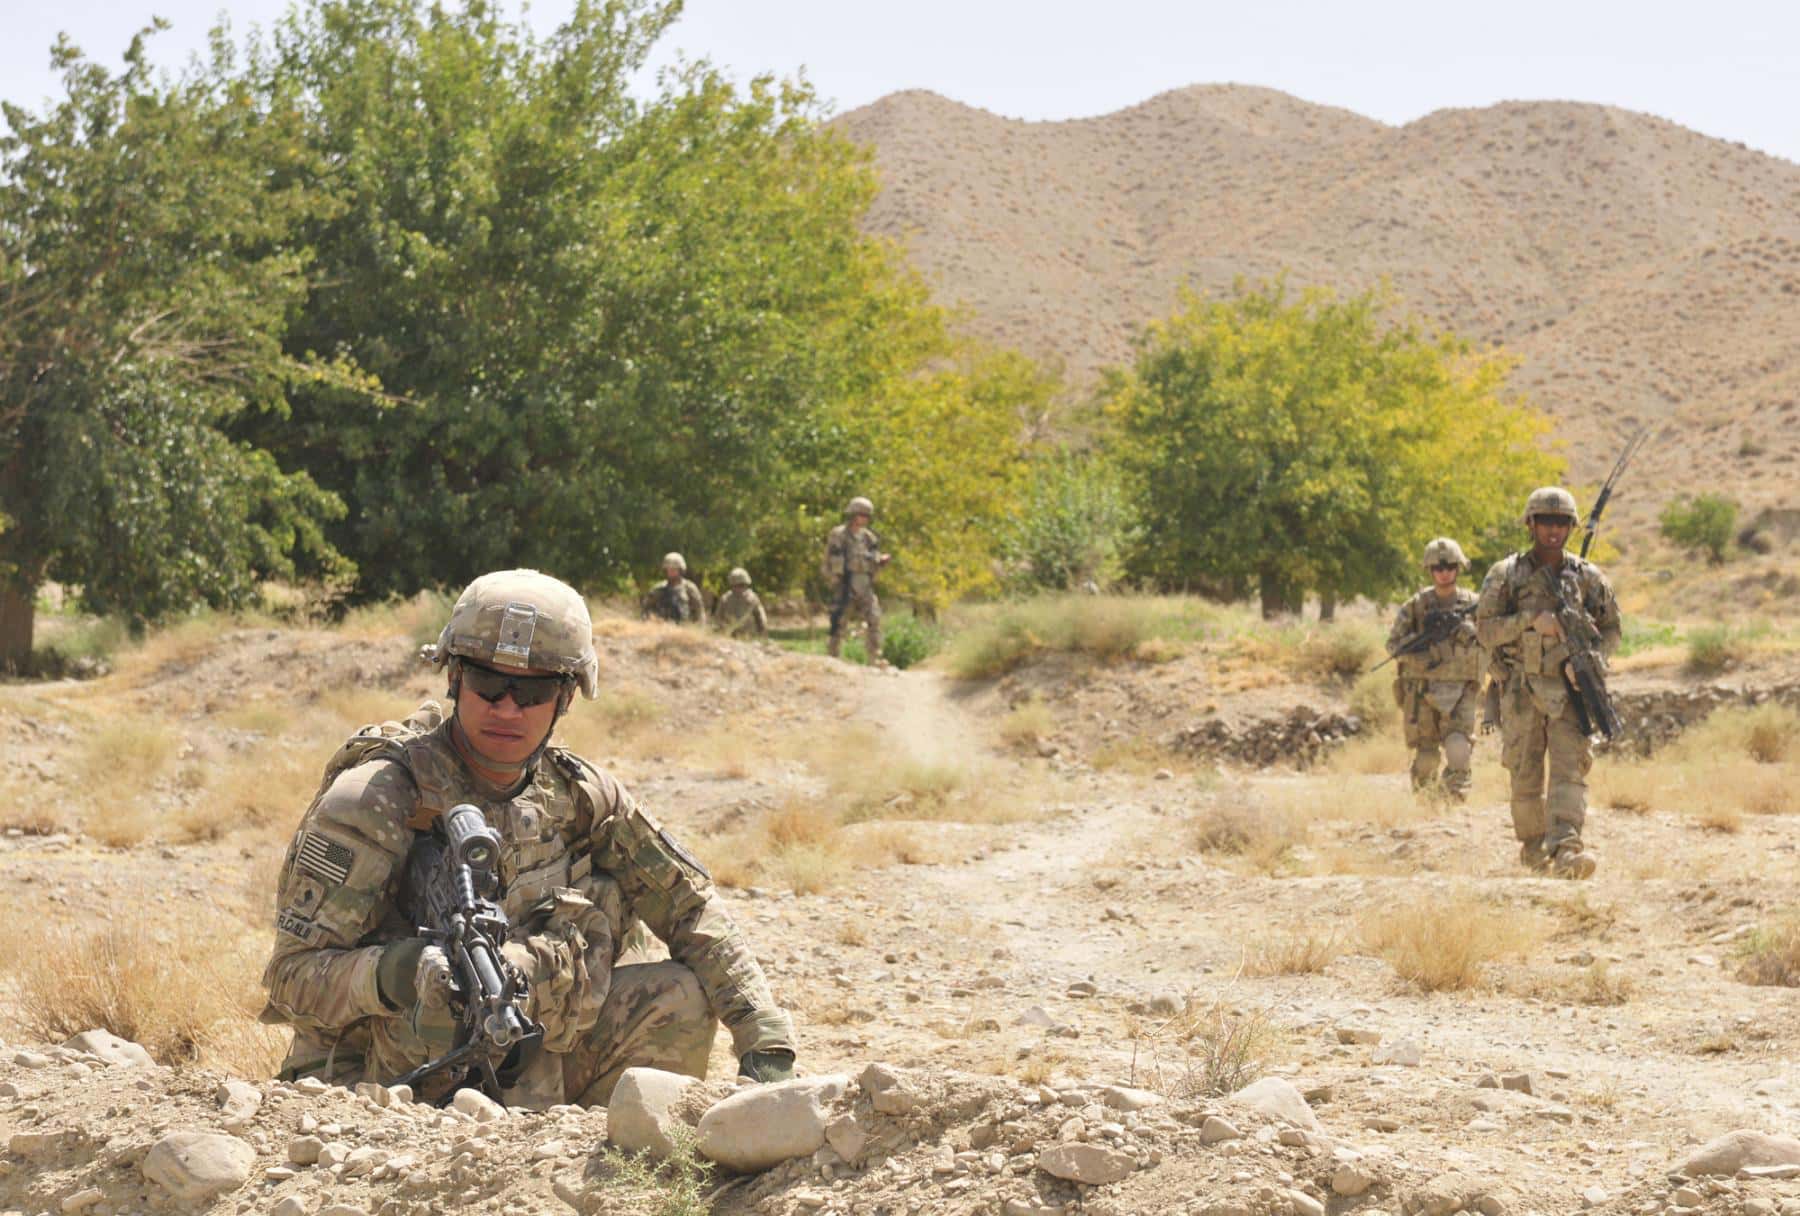
MOVEMENT TO CONTACT
See the Enemy Before the Enemy Sees You
Reference: TC 3-21.76 (Ranger Handbook) | ATP 3-21.8
Overview
The main objective is to gain or regain contact with the enemy and eliminate them. You with your unit at the area of last contact and attempt to find the enemy. Emphasis on Finding the enemy. Your unit should be the ones surprising the enemy and firing the first shots, not the other way around.
This mission does not require an ORP or recon, You just get up and go from the PB
The most annoying part of the mission is finding the enemy. There is no exact location so it can be easy to get lost or be off track hence why most of these missions end up with the enemy making first contact.
But once you find the enemy, It pretty much turns into a react to contact drill or just an attack.
Key Principles:
- Aggressive reconnaissance.
- Rapid transition to offense.
- Maintain security and momentum.
Planning Considerations
- Formations: Traveling overwatch or bounding overwatch near likely enemy positions.
- Security: Lead element (point/security squad) 100–200m ahead for early warning.
- Fires: Pre-plan indirect fires for suppression on contact.
- MASCAL: Expect high casualties — robust plan essential.
Let’s go over how to conduct an ambush step by step, using a modified TLP format.
Tip
Be warned, that this is the most chaotic type of mission. Fratricide is common if not controlled and losses can be heavy. Rely on good communication to help you understand the situation.
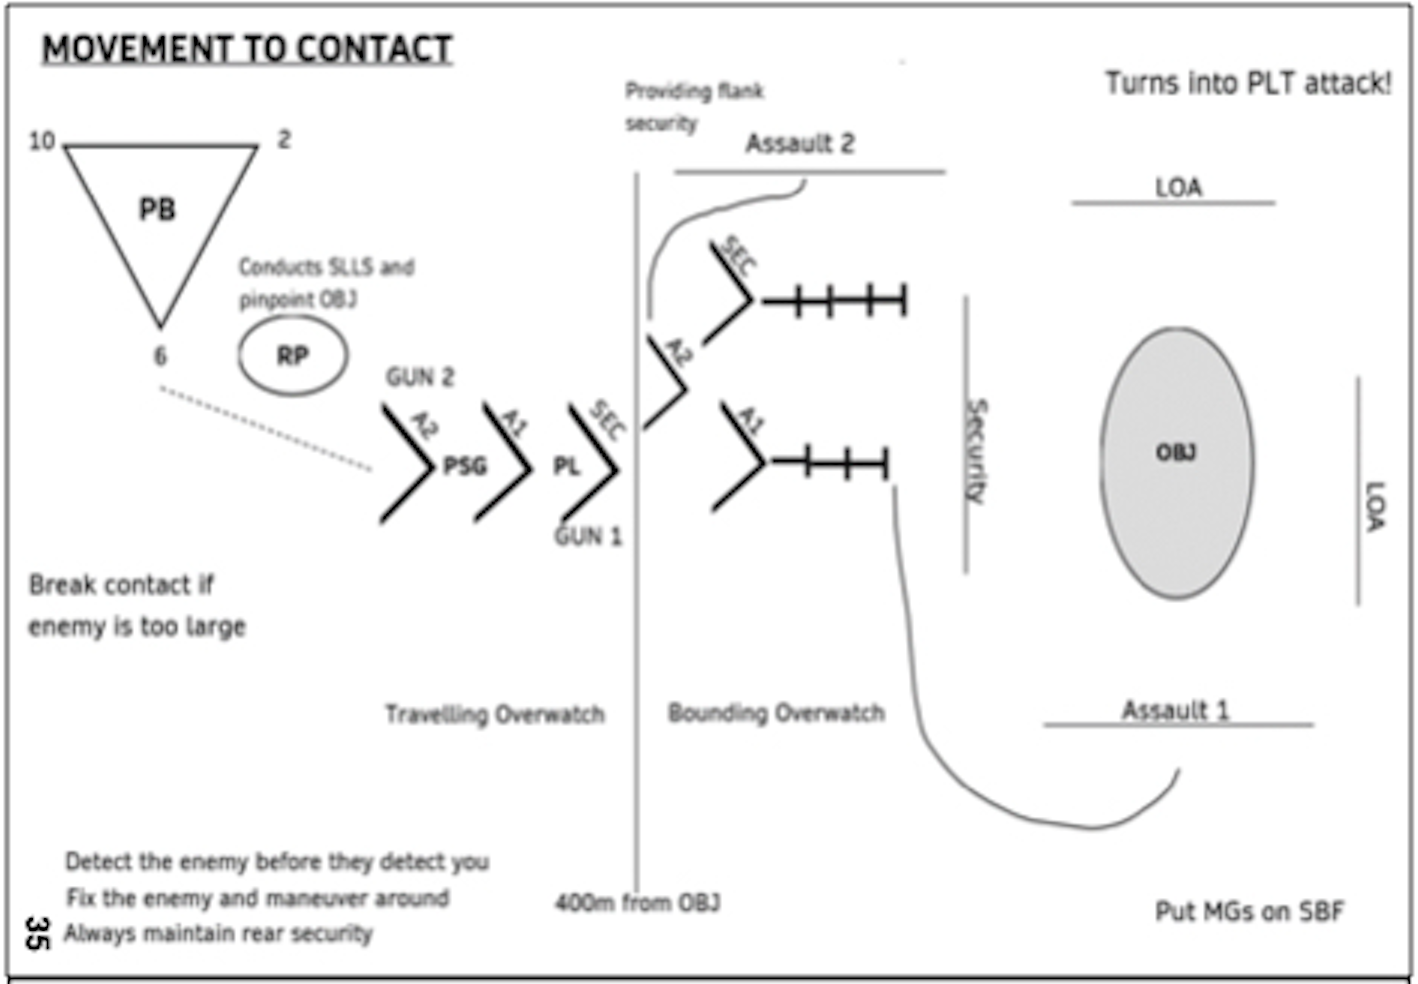
The Boxing Method
The key to success in a MTC is the “Boxing Method”
It essentially means flanking the enemy while fixing them with fire
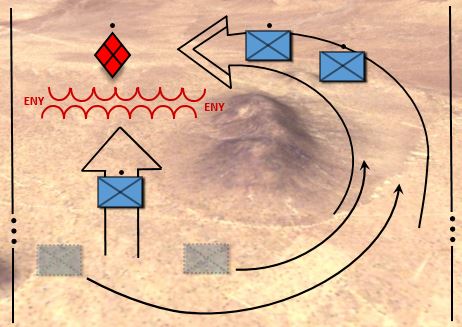
As seen in this diagram, the squad being directly attacked takes cover and returns fire while the other squads flank around
It’s common to coordinate flanks by shouting “California” or “New York” “California” means flank left, “New York” means flank right from where the enemy is attacking
- Fixing element (initial contact) suppresses.
- Flanking element maneuvers (“California” = left flank, “New York” = right flank).
- Support by fire shifts as needed.
- Assault through to LOA.
This diagram showcase the “box”, It’s the same box found in regular attack missions.
After the enemy is boxed up, the PL can call for lift or shift fires, so the flanking element can assault through
The Frontal Method
Another technique you can use in MTC is the “Frontal Method”
With this, you basically bound squads of your platoon to where the enemy is at and have the MG’s as a support role with good direction on when to lift and shift fire
- Bound squads forward under covering fire.
- Weapons squad provides base of fire.
- Less maneuver but simpler coordination.
This small video shows different types of bounding
Radio assignment
- Radio 1: PL/RTO
- Radio 2: PSG
- Radio 3: SEC SL
- Radio 4: ASS1 SL
- Radio 5: ASS2 SL
- Radio 6: WSL
1. Receive the mission
Get your locations and obj.
2. Issue the WARNO
Disseminate the Who, What, Where, When and Why Repeat the mission statement you received in the WARNO
- Assign your teams: Assign who will be ASS1, ASS2, SEC and WPN Squads
- Assign your RTO, Pointman, and special teams, (EPW, Aid/Litter)
- Disseminate timelines and step off times
- Any major terrain or weather considerations
- Tasks and rehearsals to be conducted
- Disseminate ahead of time who will go on LR (All of Sec squad, PL/RTO, Pointman)
Important
Above all, make sure you give task and purpose to everyone
3. Make Tentative Plan/Issue OPORD
Now it’s time to work on the OPORD
Tip
Use your RTO to create a terrain model for you, and let your pointman handle route planning
Assign teams if you haven’t already. You will need primary and secondary EPW and Aid & Litter teams
For the plan you should start by considering METT-TC and OAKOC Know your environment and how it will affect the mission at hand.
Complete the OPORD based on what you know and what the mission type is which in this case is MTC.
Tip
Make to sure to create a PACE plan, Don’t just rely on your radios alone.
 Unlike other missions, there is no need for an ORP when conducting MTC. You can still have one if you want to though.
You can utilize different movement techniques according to the environment you’re in, to increase your chances of making first contact.
Unlike other missions, there is no need for an ORP when conducting MTC. You can still have one if you want to though.
You can utilize different movement techniques according to the environment you’re in, to increase your chances of making first contact.
You will still do SLLS halt during the movement to check if the enemy is around
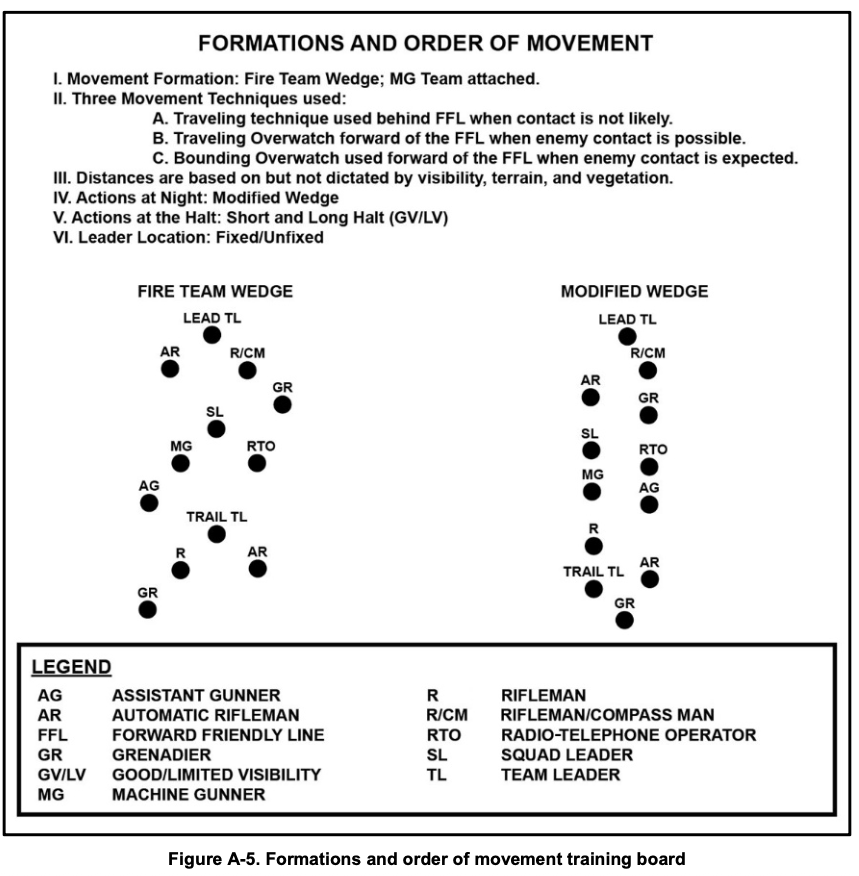
Use the fire team wedge formation and maintain security at all times
Tip
Try not to walk until you’re fired upon, actively hunt and find the enemy.
Consider a Withdrawal plan. The go to is the Red, White, Blue plan.
After you complete it, Pull your key leaders in for an OPORD brief and disseminate all info. Use your terrain model as much as possible to reinforce what need to be done. Back brief your squad leaders and make sure they know what the plan is.
If you can, bring the Alpha team leaders to the meeting.
PSG
As PSG you will make sure 360 security is set at all time, while PL is making the plan. Sectors of fire should be interlocked and noise discipline should be good.
Assign a medic
Gather LACE reports and redistribute accordingly, request for more supplies if needed
You will create and brief CCP, HLZ and AXP points. You can use your medic to help you out with this
4. Initiate Movement/Supervise and Refine

After giving your OPORD, you are ready to move out
Important
Have PSG and medic be at the release point of the PB to count people out
Here is an ORM I would typically use for this type of mission

Now, here is how to conduct this mission

1. Move
Start by moving your unit according to the ORM. Move in a wedge but may file when needed.
2. Bound
Once you get close to the last known enemy position you will start bounding, maintain 360 security while doing this
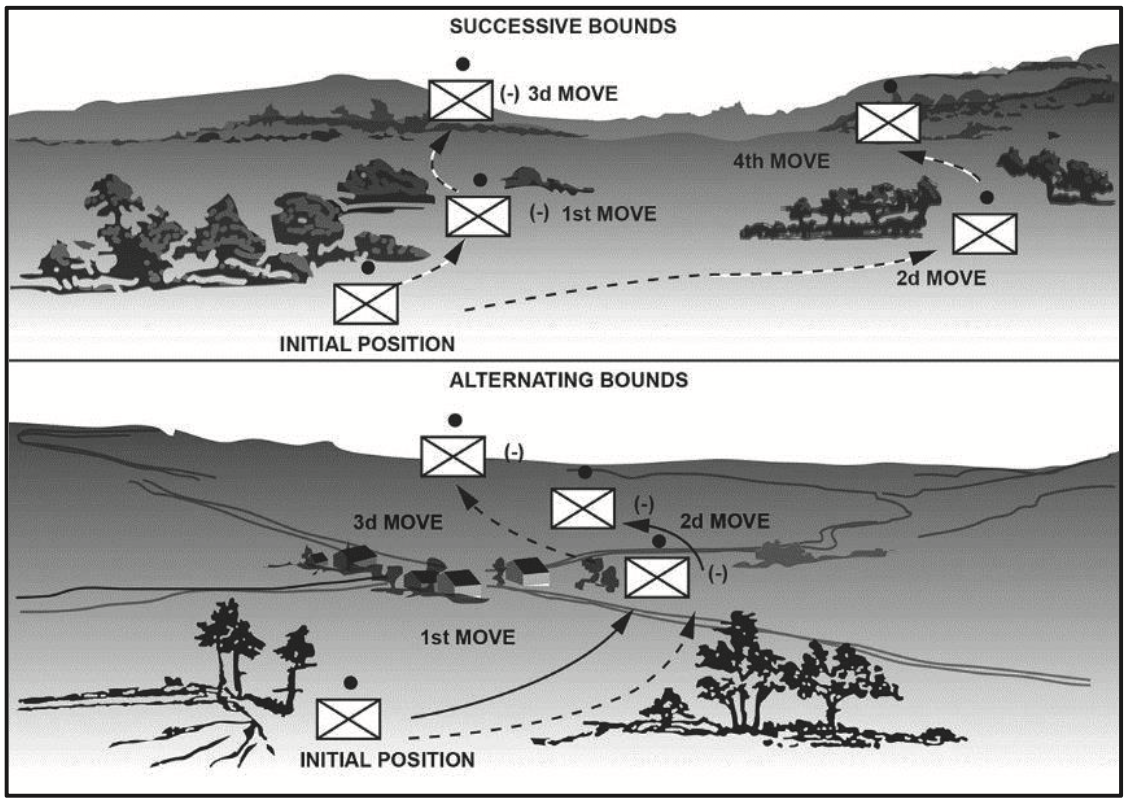 You can use either successive or alternative, successive is slower but safer.
3. Fall in line
Once Security squad receives contact, they fall in line and fire back, the Assault 1 and machine guns also fall in line.
4. Flank
The Assault 2 moves to the left (California) or right (New York). The PL calls where the flanking element should go. Once it’s called out all elements in the firing line should shift fire and allow for the Assault 2 to move in.
5. Security
While Assault 2 is bounding, ASS 1 and SEC should provide security and be on the lookout for potential enemy flanks.
6. LOA/EPW
Once Assault 2 has finished assaulting through, Assault 1 can move in and call LOA/EPW, be sure to maintain 360 sec through the process as there might be more OPFOR in the area.
Theoretically this is how it should work, every time. But in reality it always turns into a react to contact drill
Because of this, I recommend setting your leading element at least 100m apart from the main element when moving to the objective. The leading element will take contact and create the firing line where the MG’s will fall in.
It basically turns into a react to contact. Assault 1 can help provide security or you can have them fall in line.
Assault 2 will be used to flank either left or right. At that point it turns into a typical attack

Withdrawal
for withdrawal use the red, white, blue plan and go to the objective you were told to go
MASCAL
MTC often produces mass casualties — have a rehearsed plan:
- Immediate Actions: Suppress enemy, return fire, treat life-threatening injuries (tourniquets).
- CCP Establishment: Medic/PSG designate CCP (concealed, defensible).
- Triage: Medic prioritizes (Immediate, Delayed, Minimal, Expectant).
- Aid & Litter Teams: Pre-designated teams move casualties to CCP.
- Evacuation: Call 9-Line MEDEVAC; prepare HLZ if needed.
- Accountability: PSG tracks casualties in LACE reports.
Contingency
-
OPFOR WILL Flank around and incur casualties, Remember: Security is #1
-
If you get lost, halt, orient, resume.
-
Finding the enemy is the hard part, clear communication and intent is key
-
Expect heavy casualties, have a good MASCAL plan ready
Tips
- reinforce to your Joes to always yell out the 3 D’s: Distance, Direction, Description
- Keep lead element separated for reaction time.
- Use terrain for cover during bounding.
- Maintain momentum — hesitation allows enemy reinforcement.
What not to do
- Bunch up on contact.
- Fixate forward — neglect flanks/rear.
- Delay reports or fire commands.
- Abandon security during consolidation.
Closing
Just don’t freeze when fired upon, do SOMETHING